If saving money while setting up a backyard composting system sounds good to you, you’re definitely not alone. I’ve tackled a few DIY compost bins over the years and figured out how to put one together without spending much. Building your own compost bin on a budget is totally doable—sometimes you might not even need to hit the hardware store if you get creative with materials you already have. Here’s my breakdown of what you need to know, the easiest and cheapest methods, and some tips to keep your compost pile humming along.
Why Make Your Own Compost Bin?
Store-bought compost bins are nice, but if you’re watching costs, DIY bins work just as well. Composting doesn’t need to be fancy; nature gets the job done for you anyway. Homemade bins give you flexibility over size and style, so you can customize your setup for the space you have and the amount of yard or food scraps you usually collect. Plus, you’re keeping old materials out of the landfill, which is always a win.
Composting has picked up speed in neighborhoods nationwide. Many cities now offer foodwaste pickup, but home bins hand you a direct, hands-on way to turn scraps into super useful garden soil. They’re excellent for anything from veggie gardens to flower beds, and you’ll notice way less garbage heading out to the curb. If you’re aiming to cut down your environmental footprint without breaking the bank, this project is worth your time.
Choosing the Right Materials for a DIY Compost Bin
Materials can make all the difference if you want to build a compost bin on the cheap. Everyday items get the job done; think wooden pallets, plastic storage bins, or even old wire fencing. Here are some walletfriendly options I’ve used or seen work really well:
- Wooden Pallets: Most hardware stores or big box garden centers have extras they’ll give away. These make sturdy, straightforward bins.
- Plastic Storage Bins: Great for smallspace composting. Look for the biggest one you can find (18 gallons or more is ideal).
- Wire Mesh or Hardware Cloth: Leftover fencing, mesh, or even an old pet playpen forms a quick circular bin.
- Repurposed Trash Can: A plastic garbage can with some holes drilled in is a classic, nofuss solution.
Don’t stress about making the bin look perfect; function and airflow matter more. Locally, you can often stumble upon free pallets, buckets, and bins through Facebook groups, Buy Nothing pages, or recycling centers.
Building Your Budget Compost Bin: StepbyStep
I’ve noticed two main designs stand out for being cheap and beginnerfriendly: the pallet bin and the DIY plastic bin. Here’s what to do for each, plus a couple bonus ideas if you want to switch things up:
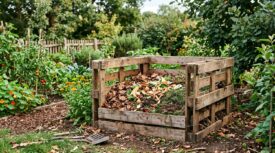
The Quick Pallet Compost Bin
- Round Up Four Pallets: Track down four that are close in size. Clean off any big nails or loose boards before assembling.
- Arrange Upright: Stand them up on their edge to form a square (three sides plus a front gate, or connect all four for a box).
- Secure the Corners: Zip ties, bungee cords, or sturdy wire at each corner will keep it all together. To really lock it in, drive wooden stakes at each corner and tie the pallets to the stakes.
- Leave the Bottom Open: Dirt access lets worms and microbes get to work. Put the bin directly on soil, not concrete.
DIY Plastic Bin for Small Spaces
- Pick a Large Bin: Any bin 18–32 gallons with a tight lid is fine. Opaque ones block light and discourage curious critters.
- Drill Holes: Use a 1/4inch bit and make holes all over the sides, lid, and bottom for airflow and drainage; do one every few inches.
- Set on Bricks or Wood: Elevate the bin slightly so moisture can drain out. Don’t let it puddle up at the bottom.
- Ready for Scraps: Start with a layer of dry leaves or shredded paper, then add kitchen waste as you go.
Both solutions build out in under an hour, mostly using materials you can stumble upon for free or dirt cheap, especially if you’re upcycling.
Getting Started and Keeping it Going
As soon as your bin is set, it’s time to load it up. Composting works better if you remember a few basics, so here’s what’s helped me keep things simple:
- Balance Greens and Browns: Alternating layers is key. Greens include kitchen scraps like veggie peels, coffee grounds, and grass clippings, while browns are dried leaves, shredded cardboard, or newspaper.
- Chop It Small: Break bigger pieces up. Shred pizza boxes or blend clunky veggie scraps for faster breakdown.
- Moisture Matters: Your compost should be damp, like a wrungout sponge. If it’s too dry, sprinkle water; if soggy, add more browns.
- Airflow: Compost piles need to breathe. Turn once a week with a garden fork or sturdy stick. In a plastic bin, just shake or roll every so often.
You don’t need fancy compost starters or specialty gear. Stick with a few rules, give it time, and you’ll get a feel for what works as you go.
Common Composting Hurdles (and Fixes!)
It’s normal to run into a snag or two your first season. Here are a few issues and how you can smooth the way:
- Smelly Pile: Usually too much green stuff or too much water. Add browns, mix it up, and let in more air.
- Slow to Break Down: May be too dry, lacking air, or filled with oversized chunks. Add water, cut things up, and stir more often for faster results.
- Unwanted Critters: Avoid adding meat or dairy. Bury scraps with a layer of browns if you spot any visitors.
Stick to plantbased scraps. I toss in eggshells and avoid oils, meats, and big branches. If your pile’s soggy or stinky, dry matter and ventilation work wonders.
Advanced Cheap DIY Tips
If you have the itch to get a little creative without spending much, try these tweaks:
- Add Two Bins SidebySide: Makes it easier to turn and transfer compost, especially if you’re collecting lots of scraps.
- Use Chicken Wire as a Lid: Keeps animals out, but lets rainwater in to balance moisture.
- Try Worm Composting (Vermicomposting): A tote or a big bucket with holes drilled in works surprisingly well for raising worms and making rich compost!
- Harvest “Compost Tea”: If using a trash can or closed bin, drain any liquid from the bottom, dilute it, and use as a natural fertilizer.
These tweaks keep composting easy and can really step up the results.
What Scraps Work Best?
Composting is very forgiving. Here’s a quick list of what goes in (and what stays out):
- Yes: Fruit and veggie scraps, coffee grounds (filter too), tea bags (if paper), eggshells, nut shells, cardboard, paper towels, dried leaves, straw, untreated grass clippings.
- No: Meat, dairy, bones, oily foods, glossy paper, pet waste, or seedfilled weeds, unless your pile gets super hot.
Stick to these and you’ll have a lowhassle, lowodor pile. If in doubt, play it safe and leave it out.
Quick Answers to Compost Bin Questions
How long does compost take?
Answer: Usually finished in 3–12 months. More frequent turning and smaller scraps speed things along.
Will a compost bin smell?
Answer: Not if you keep a good balance of browns. Smelly piles usually need air or more dry stuff.
Can I compost in winter?
Answer: Absolutely. Things break down slower in winter, but you can keep adding scraps; once weather warms up, the pile gets active again.
Making the Most of Your Finished Compost
When your pile has turned into dark, crumbly soil with an earthy smell, it’s good to go. Mix it into raised beds, sprinkle on your lawn, or use as houseplant food. Sift out any larger bits and toss them back in for another round.
Bottom line: A homemade compost bin is a smart, cheap way to cut waste and feed your garden naturally. You’ll save money, send less to the dump, and give your plants some of the best nutrition around—all for next to nothing. Get creative, make use of what’s lying around, and enjoy watching your scraps turn into garden gold, no big expenses needed. Composting this way is simple, effective, and just makes sense for anyone looking to garden or reduce waste at home.