
Growing your own garden is one of the most rewarding projects you can take on. Once you get started, it’s not only productive but genuinely enjoyable. Planning your first garden layout doesn’t have to feel overwhelming, even if you’re brand new to gardening. With a thoughtful approach, you can create a space that’s both beautiful and practical—one that fits your yard, your lifestyle, and your goals.
Why Garden Layout Planning Matters
A well-planned garden layout helps you make the most of your space from day one. It’s not just about appearance. Smart placement improves sunlight exposure, simplifies watering, and makes ongoing maintenance much easier. Skipping the planning stage often leads to avoidable problems—like relocating sun-loving tomatoes mid-season because they were planted in too much shade.
With backyard and small-space gardening more popular than ever, there’s plenty of inspiration available. Still, taking time to plan carefully helps you avoid costly mistakes and wasted effort. When your layout supports your plants’ needs, they reward you with healthier growth and better harvests.
Before You Draw: Key Things to Consider
Before sketching beds or buying seeds, assess your space carefully.
Sunlight: Track how sunlight moves across your yard during the day. Most vegetables and many flowers need at least six hours of direct sun daily.
Soil: Soil quality varies widely. Some yards are sandy, others heavy with clay. A simple soil test can reveal nutrient levels and guide improvements.
Water access: Positioning your garden near a hose or water source saves time and effort. Hauling watering cans daily quickly becomes tiring.
Wind exposure: Strong winds dry soil and damage tender plants. Fences, shrubs, or buildings can provide helpful shelter.
Access and pathways: Ensure you can comfortably reach every area without stepping into planting beds.
It’s also important to understand your local climate and planting zone. Knowing your average first and last frost dates gives you a clear timeline for starting seeds and transplanting outdoors. Local gardening groups and extension offices are valuable resources for region-specific advice. Investing time upfront reduces frustration later.
Step-by-Step: Planning Your First Garden Layout
1. Decide What to Grow
Start small and grow what you’ll actually use. If you enjoy fresh salads, consider lettuce, tomatoes, and cucumbers. For easy color, low-maintenance flowers like zinnias or marigolds are excellent choices. Culinary herbs such as basil, parsley, and cilantro add versatility and flavor to your kitchen.
2. Map Your Space
Measure your available area and sketch it on paper. Graph paper works well for keeping proportions accurate. Mark permanent features such as trees, sheds, patios, and shaded spots. Seeing everything visually helps you plan efficiently.
3. Position Garden Beds
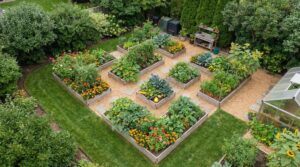
Place primary growing beds in the sunniest areas. Raised beds are especially popular because they drain well, warm quickly in spring, and offer better control over soil quality. In-ground beds work perfectly fine if your soil is healthy. If you’re dealing with poor soil, gravel, or slopes, raised beds can simplify the process.
4. Create Practical Pathways
Walkways should be wide enough for comfortable movement—ideally at least 18 inches. Mulch, gravel, or steppingstones keep shoes clean and reduce mud. Proper paths prevent soil compaction and make maintenance far easier.
5. Use Companion Planting
Some plants grow better together. Basil planted near tomatoes may help deter pests. Marigolds along bed edges can discourage nematodes while adding cheerful color. Including pollinator-friendly flowers supports beneficial insects and improves overall garden health.
6. Think Vertically
In small spaces, vertical growing makes a significant difference. Trellises, cages, or stakes allow peas, beans, and cucumbers to grow upward instead of spreading out. This approach increases yield without requiring additional ground space.
7. Plan for Crop Rotation
Even beginners benefit from simple crop rotation. Avoid planting the same plant families in the same spot each year. Rotating crops reduces pest buildup and supports long-term soil health.
Choosing the Right Layout Style
Several common garden layouts work well, depending on your space and preferences.
Row Gardening: Traditional and practical for larger areas. Rows are ideal for growing higher volumes but require more space between plantings.
Raised Beds: Framed boxes, typically three to four feet wide, filled with quality soil. They’re excellent for beginners and helpful in areas with poor native soil.
Square Foot Gardening: Beds are divided into one-foot squares, with a different crop in each square. This method maximizes small spaces and keeps planting organized.
Container Gardening: Perfect for patios, balconies, or rental properties. Herbs, greens, peppers, and compact tomato varieties grow well in containers.
Many gardeners combine these methods—for example, raised beds for main crops with containers around the perimeter for herbs and flowers.
Smart Plant Placement
Position sun-loving crops—such as tomatoes, peppers, and melons—in the brightest areas. Leafy greens and certain herbs tolerate partial shade, making them good candidates for spots with afternoon protection.
Observe how water drains after rainfall and avoid areas where water pools. For wind protection, place taller plants where they can shield smaller ones, or use simple supports like stakes or mesh fencing.
Keep taller plants on the north or east side of beds so they don’t shade shorter crops. In container gardens, group plants with similar sunlight and watering needs together to simplify care.
Common Layout Mistakes to Avoid
Overcrowding: Packing plants too closely restricts airflow and increases disease risk. Follow spacing recommendations on seed packets.
Narrow paths: Tight walkways make harvesting and maintenance awkward and can spread disease as you brush against plants.
Ignoring sun patterns: Shade from trees, fences, or buildings changes throughout the day. Pay attention before planting.
Growing what you won’t use: Focus on crops you enjoy eating or sharing.
Planning for Seasonal Changes
Some plants thrive in cool weather, while others prefer heat. Leave room for early spring crops and fall plantings. Lightweight row covers can extend your growing season by protecting plants from frost.
In colder regions, cold frames or mini hoop houses provide additional protection. In hotter climates, shade cloth helps prevent sun scorch during peak summer heat.
Practical Tips for Success
- Start small—two 4×8 beds or a few large containers are plenty for beginners.
- Keep a garden journal to track planting dates, sun exposure, and results.
- Test and improve your soil over time.
- Label seedlings to avoid confusion.
- Add mulch to retain moisture and suppress weeds.
- Connect with local gardeners for region-specific advice.
- Keep tools clean and organized to make tasks easier.
Adding a compost bin near your garden is another smart step. Compost enriches soil naturally and reduces kitchen waste, while encouraging regular garden check-ins.
Lessons Learned
In my early gardening days, I overcrowded plants, built narrow paths, and experimented with too many unfamiliar crops. Over time, I simplified my approach—focusing on reliable plants, proper spacing, and practical design. Wider paths, consistent mulching, and a basic drip or hose watering system made a dramatic difference.
Gardening is an evolving process. Each season brings lessons and opportunities to improve your layout. With thoughtful planning, patience, and a willingness to adjust, even a small yard—or a few containers—can become a productive and beautiful space.
Most importantly, remember that gardening should feel enjoyable and restorative. A well-planned layout simply makes that experience smoother and more rewarding.