Composting is one of those habits that pays off for both the planet and my garden. For beginners, the idea of turning kitchen scraps and yard waste into nutrientrich soil might feel a bit overwhelming at first. I’ve found that once you know what goes where and why it matters, composting becomes a rewarding routine that’s simple to maintain and super helpful for cutting down on waste. Here’s my friendly guide to getting started with composting, including some practical tips for setting up your own system and reasons why making your own compost is worth your time.
Why Composting Actually Matters
Composting is more than just tossing leftovers in a bin. It’s a way to reduce the load we put on landfills and create rich soil that makes gardens and plants thrive. Each year, food and yard waste make up a huge portion of what’s sent to landfills. Composting at home helps keep that waste out of landfills, which in turn reduces methane emissions; a really important step for fighting climate change.
Food waste that ends up in the garbage doesn’t break down in the same way it does in a healthy compost pile. Instead, it sits in an oxygen free landfill, producing methane, a greenhouse gas that’s stronger than carbon dioxide. The Environmental Protection Agency shares useful stats showing that cutting back landfill waste via composting can really support local and global sustainability efforts (source).
On top of that, homemade compost is packed with nutrients that boost plant growth and help retain moisture in the soil. This means healthier plants for me with fewer storebought fertilizers. It’s a win win for both the environment and my wallet.
Composting Basics: How Composting Works
For composting to work, a mix of organic materials breaks down with help from air, moisture, and plenty of microorganisms. The key players here are things like bacteria, fungi, and even worms if I’m using a worm bin (also called vermicomposting).
The basic recipe comes down to balancing two main types of materials:
- Greens: These are moist, nitrogen rich materials like fruit and veggie scraps, coffee grounds, and grass clippings.
- Browns: These are dry, carbon rich bits like dried leaves, cardboard, paper towels, straw, and small branches.
Getting this balance right is what helps the pile decompose efficiently and avoids a slimy or smelly mess. I always aim for roughly three parts browns to one part greens by volume.
Setting Up Your First Compost Bin or Pile
Starting a compost pile doesn’t require a fancy setup or a huge yard. There are plenty of ways to compost no matter my living situation. Here are some practical ways to get started:
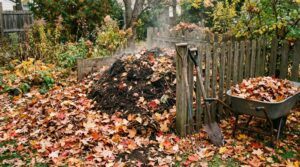
- Outdoor Pile: In a backyard, a simple pile of mixed greens and browns in a corner does the trick. I might want to surround it with chicken wire or a wooden frame to keep things tidy and post-free.
- Compost Bin: Many hardware stores sell bins designed for composting. These contain the pile and help keep the heat and moisture in, which speeds things up.
- Tumbling Bins: A closed bin with a handle for turning makes aerating super easy and is great if I don’t want to handle the compost by hand.
- Indoor Methods: If I don’t have a yard, a worm bin or under sink composter lets me compost kitchen scraps indoors with little hassle.
The main thing is picking a spot that’s easy for me to access, has good drainage, and gets some sun. If my compost is outside, a shady spot keeps it from drying out too fast in summer. It can also be helpful to start with a small, manageable bin and move on to larger systems once you’re comfortable.
What to Compost and What to Avoid
Not every kitchen scrap or yard bit belongs in the compost pile. Here’s a quick rundown of what works best and what to leave out:
- Compostable Items: Fruit and veggie peels, coffee grounds, tea bags (without plastic), eggshells, grass clippings, dry leaves, shredded paper, cardboard (no glossy finishes), and small wood chips.
- Skip These: Meat, dairy, bones, oily foods, pet waste, diseased plants, and anything treated with pesticides that could harm my budding compost microbes.
I also avoid large branches or thick pieces since they take forever to break down. Cutting up scraps or tearing cardboard into small pieces makes things decompose much quicker. You’ll see the impact of chopping things into smaller bits, especially with tough garden waste.
Easy Steps to Start Composting at Home
- Pick a Composting Spot: Choose a place that’s easy to reach but not right up against my home or neighbor’s fence.
- Layer Materials: Start with a layer of browns at the bottom, then add greens, and keep alternating as I add new scraps.
- Keep It Moist: The pile should feel like a wrung-out sponge; not soaked, just damp.
- Turn or Mix the Pile: Every week or two, give the pile a turn or a stir to add oxygen. This helps it break down faster and stay odor free.
- Wait for “Black Gold”: After a couple of months (outdoor compost, about three to six months depending on conditions), I get dark, crumbly compost that smells earthy. That’s when it’s ready to use in the garden or with houseplants.
Following these steps, my kitchen and yard scraps are transformed into awesome compost for growing veggies, flowers, or even just a greener lawn. Even city folks with limited space can compost on a smaller scale using indoor systems and community programs.
Common Beginner Challenges and How To Solve Them
Running into issues with composting happens to pretty much everyone starting out. Here are some challenges I used to face along the way, plus what works to fix them:
- Bad Smells: Strong odors usually mean too many greens (wet stuff), not enough air, or maybe the pile is too wet. I add more browns and mix the pile to help it breathe. Sometimes just flipping it makes a difference.
- Pests: Animals get interested if I add meat, dairy, or oily foods. Sticking to fruit, veggies, coffee, and yard waste avoids most critter problems. Closed bins or wire mesh help too.
- Slow Decomposition: If the pile barely changes, it’s probably too dry, too wet, or doesn’t get mixed enough. I check the moisture, make sure it’s not soggy or dry, and turn it more often for faster results.
- Matted Leaves or Layers: Sheets of leaves or paper squish down into a dense mat, blocking airflow. Tearing these up or mixing them with rough items like small sticks keeps the pile loose and aerated.
Small steps prevent big headaches, and spotting issues early means your compost pile stays happy and productive.
Simple Ways Composting Benefits You and the Planet
- Saves Money: Homemade compost replaces the need for storebought fertilizers, plus I get fewer trash bags to buy.
- Reduces Waste: Composting kitchen and yard scraps means less trash going to the landfill.
- Improves Soil: Compost adds nutrients to garden or houseplant soil, helps water retention, and even supports beneficial bugs and worms.
- Builds Community: I share extra compost with neighbors, use town compost drop-off programs, or get involved in community gardens to meet people and spread green habits.
The cool part? Even if I’m not a bigtime gardener, composting still makes a difference. Some towns and cities have compost drop-off or pickup services. That way, even apartment dwellers can take part. The movement grows fast when communities come together.
Extra Tips and Tricks For New Composters
- Chop It Small: The smaller I cut up food or yard waste, the quicker it breaks down. Chopping with a shovel or kitchen knife can really speed things up.
- Add Variety: Mixing up what I compost (different types of browns and greens) keeps the microbes happy and working efficiently.
- Monitor Moisture: Using a simple moisture tester or squeezing a handful of compost gives a quick check if things are too wet or too dry.
- Compost Tea: Soaking finished compost in water makes a “tea” for watering houseplants or garden beds and giving them a nutrient boost.
- Store Scraps Smart: Keep a small bin or container in the kitchen for collecting scraps, and empty it frequently to your compost bin. This minimizes mess and makes the process smoother. You can even freeze food scraps until you have enough to add to your bin, reducing smells in hot weather.
As with any new routine, I find that composting gets easier with practice. I tweak things as I go and learn from both the wins and the mess-ups. If you have kids, letting them help with turning the pile or spotting worms can be a fun outdoor activity.
Beginner Composting FAQ
Question: How long does it take to get finished compost?
Answer: It varies! With good mixing and the right materials, outdoor piles can turn to compost in three to six months. Tumblers and indoor bins sometimes work a bit faster, especially in warmer, moist environments.
Question: Can I compost in winter?
Answer: Absolutely. Composting slows down when it’s cold, but adding kitchen scraps, browns, and occasionally turning the pile keeps the process going. Things will pick up again once it warms up. Adding more browns during wet winter weather can help keep the balance right.
Question: Does composting attract bugs?
Answer: I notice a few bugs, but most are actually helping break things down. Keeping meat, dairy, and oils out of the pile stops unwanted pests. Using a bin with a lid helps too. If flies appear, adding browns and burying new food scraps under existing compost cuts down on them fast.
Start Simple, Make a Difference
Getting started with composting is all about setting up a simple system that works for my space and sticking with it. Each small batch of compost I make keeps waste out of the landfill and supports a healthy garden or landscape. The more I compost, the more I notice the benefits: healthy plants, less trash, and a lighter footprint on the earth. If you’re curious to see how easy it is, grab those veggie peels and give home composting a try. Small steps today grow into big environmental wins tomorrow.